The best $50 you can spend to save your $10,000 digital sensor
There’s an old saying that goes, “One of the easiest ways to make money is to save money.” Nothing could be truer when it comes to preserving your practice’s digital sensors.
By spending $50 (or less) on a couple of simple items, you could save $10,000 (or more) on purchasing a new sensor. And if you’re like me, I bet you can come up with a few good ways to spend an extra $10,000.
Here’s how this works:
There are two very common computer accessories that can help you extend the life of a “direct USB” digital sensor. These accessories are used every day by computer users all over the world, but not necessarily for this purpose. (In fact, you might be using one of them right now.) Some companies, DentiMax being one of them, include one of these items with the purchase of a new sensor. But this practice is not standardized.
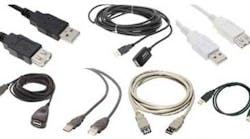
Item #1: Simple USB extension cable (Note: this must be a short cable, i.e., 1’ to 3’)
Quantity: One per sensor
Cost: $2 - $5
After you go to your favorite retail store and buy these cables, attach them to your sensors. Then leave them attached – they should always stay attached to your sensors.
Note: You should have one of these cables per sensor, not per computer that the sensor is associated with.
Now, when the sensor is moved from op to op, keep the short extension cable with it. In other words, when the sensor is plugged and unplugged from its computer, it is the extensioncable that should be used for the connection, not the sensorplug itself.
Doing this saves on the wear and tear that’s usually applied to the USB connection of the sensor, instead of adding wear and tear to the USB plug of the sensor. This method displaces that wear and tear and applies it to the inexpensive USB extension cable.
Why do this? It’s a numbers game: Standard USB plugs are generally rated for about 1,500 connections. Through daily use in a dental office, a sensor’s plug can hit that number in a short time.
When the constant plugging and unplugging of the device finally starts to wear on the connection, simply replace the short extension cable instead of the sensor’s expensive cable.
Here’s another situation where this comes in handy:
Say someone happens to trip over the sensor cable. With this method, hopefully the USB extension cable will be damaged, and not your sensor. Even better, this method can create a potential breakaway point so that the USB connection between the extension cable and the sensor itself can come apart or become disconnected instead of the sensor’s USB plug bending or breaking the USB port on your computer. This alone can save you thousands of dollars.
Item #2: Powered USB hub
Cost: $20 to $45
Is there a room in your house where you have used the vacuum cleaner often? Have you experienced that, after time, the constant use of that outlet with the vacuum plug makes it “loose” over time, so that the plug doesn’t fit the outlet as well as it used to? This is caused by simple wear and tear on that electrical outlet.
This is very similar to what happens to the USB ports on your computer when your direct USB digital sensor is plugged and unplugged into it every day. USB ports on computers were designed to have USB devices plugged and unplugged from them, but not exactly the level of use that they receive with digital sensors. Over time, that wear and tear adds up and can damage your device.
What’s more, if one of your ops is set up so that the sensor is stretched to its full length on either side of the chair, then there is even more wear and tear put onto the port. Sideways pressure can actually stretch out the port and make it slightly wider so that the connection is not solid.
Here’s how you fix this: Use a powered hub.
A powered hub can be plugged into one of the back, direct motherboard ports on the computer. You can run a 6’ USB extension cable from the back of the computer and keep the powered hub on the countertop. Or you can use double sided tape and attach the hub to the side of the cabinet underneath the countertop (this is my favorite). This keeps it out of the way, frees up valuable countertop space, and makes it easy to correctly plug and unplug the sensor.
But what kind of hub should you get? Here’s the answer:
Powered hubs are preferred over non-powered USB hubs for digital sensors because the sole source of power for the sensor comes directly from the USB port. The maximum effective length for any USB device is 16’, so if you go longer without adding additional power, the device loses full power, and therefore loses signal strength. Sometimes the sensor can even stop working due to lack of power if the cables are too long.
Using a powered hub ensures that when you add length to your digital sensors, your sensors are being fully powered.
You want to get a good quality powered hub, so don’t buy the cheapest one. They aren’t that expensive to begin with. Talk with your network tech or someone who knows about the devices. I’ve had good luck with Belkin 4-port powered hubs.
Conclusions
By adding these two simple items to your computer system in the operatories, you will ensure that you increase the lifespan of your CMOS, direct USB digital sensor. You will also organize your operatory’s computer cables to keep things looking neat and clean. You can add length to your USB sensor without fear of losing performance, causing technical issues, or preventing the sensor from working.
By far the best reason for adding these two items is that you create breakaway points for the sensor in case of an accident. Instead of the sensor being damaged, one of the connection points should break away from the rest of the cables, keeping the sensor from being damaged. Even if the cables do somehow stay connected to the computer during an accident, then chances are that the cheaper USB extension cable will take the damage.
As the years fly by and the normal daily use of your sensors causes wear and tear on your USB connections, you’ll be protected. Instead of needing to replace a computer, a sensor cable, or an entire sensor, you’ll simply replace the inexpensive USB extension cable or USB powered hub, saving you thousands of dollars.
James W. Ramey is the director of digital imaging for Dentimax. He has a bachelor of science in management information systems from the University of Akron. For over 10 years he has worked exclusively with digital radiography technology. His experience includes work on digital imaging software, virtually all of the intraoral sensors on the market, digital panoramic/cephalometric units, intra- and extraoral cameras, and CBCT/cone beam technology. He has consulted with hundreds of practices on the correct way to set up their digital operatories, working with doctors to ensure they have the best equipment for their workflow needs. You can reach him at [email protected].


