Navigating shade selection for a single central incisor with esthetic zirconia
As far as emulating natural tooth color and esthetics goes, the single central incisor is one of the greatest restorative challenges for the dentist and lab technician. In the history of lab-fabricated restorations, both parties have sought to achieve esthetics, strength, and ease of use to obtain the most desirable mix of properties for everyday fixed restorations.1 Selecting the shade of the restoration depends on the crown material selected, the prep design, and the prep shade underneath.2 Thankfully, the ongoing evolution of restorative materials has brought practitioners more options on the market. These include zirconia, pressed ceramics such as lithium disilicate, and feldspathic porcelain, among others.
In the past, many dentists argued that pressed ceramics and feldspathic porcelain materials were most esthetically favorable to replicate natural teeth due to their high translucency and low opacity characteristics. But recent advances have allowed zirconia to achieve greater esthetics than before while maintaining the strength for which is it known. In addition, the clinician is not limited to use resin cements as one would for more translucent restorations. Instead, zirconia can be cemented with resin-modified glass ionomers (RMGIs), which have been demonstrated to have long-term success in retention and cariostatic properties.3
Related reading:
Dental photography
High-definition photography is an essential supplement to enhance communication with the lab, especially if the dental technician cannot meet the patient in person. There are many shade-mapping tools available today to create adequate esthetic matches. Examples include polarized lens and lights and Master Dental Technician Sascha Hein’s white balance reference card used in conjunction with eLab prime software. However, reference photography with shade tabs is one of the most highly effective means to document shape, surface morphology, translucency, chroma, and hue.4 Every experienced technician has their own method of replicating color and texture. The key to achieving success is to bring the technician into the discussion and inquire about their preferred material. Color buildup, whether on porcelain or zirconia, reveals a technician’s technical ability.2
Case report
A 52-year-old female came to the office with a chief complaint of a chipped lower left central incisor that did not penetrate the pulp (figure 1). The patient reported that she has had an anterior crossbite on this tooth throughout her entire life, and she refused orthodontic treatment to resolve it. The patient adamantly requested to save the natural tooth if possible.
She was warned that endodontic treatment might be needed in the future and that the prognosis of the case was fair to good. Esthetic concerns were less important to the patient than the functional replacement.
Diagnosing the problem
As part of the diagnostic phase, the tooth tested positive to the cold test. Full-mouth intraoral photos of the dentition in maximum intercuspation were taken immediately with the teeth slightly apart in anterior and lateral views. A Nikon D7200 DSLR camera in manual mode with the Nikon AF-S VR Micro-NIKKOR 105 mm f/2.8G IF-ED lens, twin flash, and bouncers were used at F36, ISO 200, shutter speed 1/200 to communicate texture, glaze, luster, characteristics, and colors of the teeth adjacent to tooth no. 24.
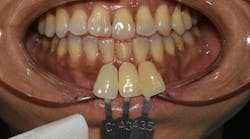
Fortunately, the colors of the patient’s teeth were quite consistent, so it was relatively easy to select two shade tabs to accompany the reference photos to communicate the cervical, middle, and incisal shades (figure 2). The lab technician preferred this two- to three-shade tab selection method for working with a base shade to start.
Restorative treatment
The patient was anesthetized. A #0 Ultrapack cord (Ultradent) with Hemadent (Premier) was placed into the sulcus for hemostasis and retraction. Glass ionomer was placed as an indirect liner. The fractured remnant was etched with 37% phosphoric acid for 15 seconds and rinsed thoroughly, bonded with Prime and Bond Elect (Dentsply Sirona), and restored with Shade A2 TPH Spectra HV (Dentsply Sirona). The #0 cord was removed, the prep thoroughly rinsed with water and dried, and the final PVS (Affinity Heavy and Light Body; Clinician’s Choice) upper and lower impressions and a bite registration (Affinity Quick Bite; Clinician’s Choice) were taken. Photos of the preparation were taken using two VITA shade tabs that best matched the prep shade. The crown was temporized, and the patient was asked to return in two weeks for try-in (figure 3).
Once the photos were sent to the lab, the dentist and technician discussed in full the details of the adjacent teeth that we wanted to replicate on the fixed restoration. Such details included replicating existing craze lines, incisal translucency, and line angles. One benefit of this case was that the adjacent teeth were smooth, which made the case relatively easier as surface texture can affect brightness, color saturation, luster, and more. In this case, we decided that esthetic zirconia would be an acceptable choice.
Posttreatment
Upon the patient’s return, the provisional was removed, excess temporary cement was cleaned off with pumice and water, and the esthetic zirconia crown was tried in with water. The patient evaluated the size, shape, and color of the final unit and approved it for final cementation. The restoration was removed after try-in, thoroughly rinsed with oil-free air, and the entire bonding surface of the intaglio was covered with Ivoclean (Ivoclar Vivadent) with a microbrush and left on for 20 seconds to take effect. The intaglio was then rinsed thoroughly with water spray and dried with oil-free air to prepare for traditional cementation.
The tooth preparation was thoroughly conditioned for 20 seconds with Fuji Plus Conditioner (GC America), rinsed thoroughly with water, and gently dried. An RMGI cement, Fuji Plus (GC America), was applied to the intaglio surface of the crown and seated within 30 seconds. The cement was allowed to set until gel phase for easy removal of excess one minute after seating (figure 4). Isolation was maintained until the final set was verified for about four minutes. Final removal of any excess was completed. Occlusion was adjusted and the surface was polished to prevent abrasiveness to the opposing dentition.
Conclusion
The single central incisor can be the most difficult tooth for a dental technician to faithfully reproduce in terms of shade-matching. Developing excellent photographic skills is worthwhile, because high-definition photos yield more information than any highly detailed written narrative. The photographs, reference tabs, and communication between the dentist and lab technician, as well as the lab technician’s knowledge and talent, are of paramount importance in creating an artificial replacement that is perceived as “natural.”
Acknowledgment: The author would like to thank Kalsang Tsangsar and the team at Advanced Dental Lab in New York, New York.
Editor’s note: This article first appeared in Through the Loupes newsletter, a publication of the Endeavor Business Media Dental Group. Read more articles and subscribe to Through the Loupes.
References
- Ritter RG. Use of high translucency zirconia in the aesthetic zone. Dentistry Today. September 16, 2013. https://www.dentistrytoday.com/use-of-high-translucency-zirconia-in-the-aesthetic-zone/
- Kahng LS. Material selection and shade matching for a single central incisor. J Cosmetic Dent. 2006;22(1):80-86. https://www.gcamerica.com/lab/products/GC_Initial/article18-Initial_PC_%20LF_SingleCentral.pdf
- Christensen GJ. What cement type is best in 2021? Dent Econ. May 1, 2021. https://www.dentaleconomics.com/science-tech/article/14199705/what-dental-cement-type-is-best-in-2021
- Fondriest JF. Shade matching a single maxillary central incisor. Quintessence Dent Technol. 2005;28:215-225. https://www.researchgate.net/publication/200450422_Shade_matching_a_single_maxillary_central_incisor


