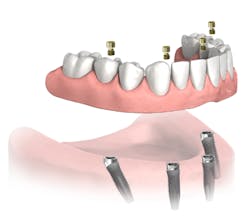
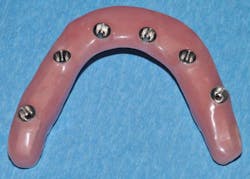
MY COLLEAGUES FREQUENTLY ASK ME what my hygiene follow-up protocol is for full-arch All-on-4fixed bridges (Nobel Biocare; figure 1). There seems to be a wide spectrum as to how clinicians treat patients after their final All-on-4 bridge is delivered, and I am sure that many options exist to adequately manage these patients in the dental hygiene department.
Figure 1: Fixed full-arch bridge
In this article, I will share the follow-up protocol I have used over the last 13 years, as well as some of my reasonings for doing so. I don’t offer any clinical research to support my protocol. I simply developed this protocol after having treated and maintained hundreds of full-arch fixed implant bridges, and this is what works in my practice. If you are looking for a protocol for your practice, I recommend using this one as a quick baseline program and then developing your own customized practices over time.
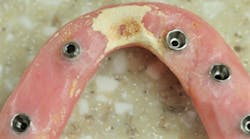
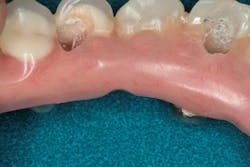
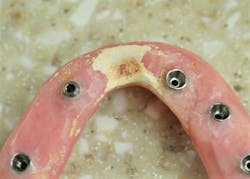
One of the most important steps that you can take to improve the chances of patients adequately maintaining their oral hygiene is to set up your plan for success from the beginning. Patients are often referred to my practice with complications after the delivery of their final prosthesis. A common origin of these complications is inadequate vertical height for the bridge. Aside from this resulting in fractures of the bridge, it is also the primary source of creating a concave intaglio surface (figure 2).
Figure 2: Concave intaglio = hygiene nightmare
The patient whose bridge is shown in Figure 2 returned to her dentist after the final bridge was placed complaining of speech difficulty and pain. The dentist told her everything was normal and that she needed to adapt to the bridge. Three months later, the patient presented to my office. The speech issue was legitimate in my opinion (that’s a story for another day), but I was concerned about the sensation of pain.
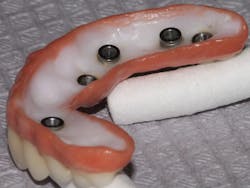
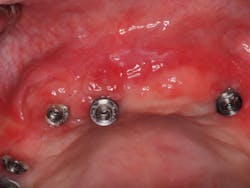
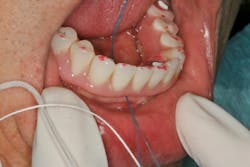
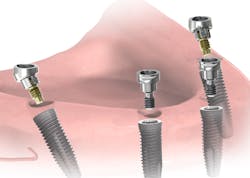
I removed the bridge to find the intaglio packed with food debris. The patient’s tissue was inflamed (figure 3), and she had developed a fungal infection. This could have been avoided with better presurgical preparation, adequate bone reduction, and proper vertical space development, which would have allowed the lab to make a hygienic intaglio (figure 4). Note the smooth and flowing intaglio surface in Figure 4. This is a bridge that can be easily maintained by the patient and hygienist.
Figure 3: Inflamed tissue from an inability to clean under the bridge
Figure 4: Ideally convex intaglio surface for easy cleaning
Planning tips to set the stage for adequate hygiene:
- Ensure that the intaglio surface of the bridge is convex and hygienic.
- Avoid flanges on the intaglio. If they are absolutely necessary for support of the denture teeth or for esthetics, keep them 2 mm to 3 mm or less in height and only on the facial. This will minimize food retention.
- Plan the proper number of implants to balance support of the bridge with the patient’s ability to keep the bridge clean. If a patient has struggled for a lifetime with maintaining his or her oral hygiene and you decide to place eight implants under a fixed bridge, you have to ask yourself if it is reasonable to assume that the patient will keep the bridge clean. Could you have used six, five, or even four implants in cases where hygiene is a concern? Fewer implants lessens support, but the implants will be easier to clean. Adapt your plan to the patient’s needs.
- If your patient’s follow-through with hygiene is a genuine concern, then I recommend using a bar-supported overdenture. Overdentures aren’t sexy and can be removed, which can be unappealing to patients, but they are way easier to clean if hygiene will be an issue.
Tips to follow prior to sealing the access holes at the final bridge seating:
- At the final seat have the patient demonstrate his or her ability to floss under the bridge prior to the final torque of the screws. Adjust the bridge for access as needed. I recommend torquing the screws with firm finger pressure and sealing the access holes temporarily. After three to four weeks, have the patient return and confirm that he or she can adequately clean under the bridge. If the patient cannot, it will be easy to remove the bridge and make adjustments. Once you are satisfied that the bridge is hygienic, you can final torque the screws and seal the access holes with Teflon (plumber’s tape) and composite.
- If the patient struggles to clean under the bridge even after adjustments, consider creating lingual access channels for floss or suggest a Waterpik (Water Pik Inc.). Cut these in with an acrylic bur and smooth them with acrylic polishers or pumice (figure 5).
Figure 5: Lingual channels to improve floss and Waterpik access
It is critical to stress the importance of adequate home care to patients. Patients will develop their own routine, but your coaching can get them there more quickly.
I recommend the following home-care techniques for my patients:
- Use a Waterpik at least twice a day. Patients can access the bridge from the buccal or lingual; it doesn’t matter which. Patients will want to find the access points that result in the greatest dislodgement of retained food. I recommend using the medium or low setting. The high setting might separate nonkeratinized tissue attachment from the implants if it is present.
- Floss under the bridge at least once daily. Super Floss (Oral-B) works well, but if the firm end softens too quickly, have patients tie the Super Floss to a floss threader (figure 6). Some patients prefer the curved and firmer bridge threaders. I give samples of all of these to my patients, so they can customize their home care.
- TePe has an excellent line of implant cleaning products. The company offers multiple shapes and sizes of specialty toothbrushes and interdental brushes specifically designed for implants. Patients can buy them on Amazon.com.
- Use a sulcus brush to clean the part of the bridge that transitions to the soft tissue. A sulcus brush is about one-third the width of a traditional toothbrush. Many patients find it easier to use this to clean and massage the tissue contact areas of the bridge.
- Rinse daily with Peroxyl (Colgate) to debride smaller particles from under the bridge.
- If soft-tissue swelling occurs, have the patient rinse with Peroxyl and warm salt water for two to three days. If the swelling persists, see the patient at your office.
- Some patients love Peridex (3M), and others hate it. If they will use it daily, then I’m happiest, but I don’t force it on my patients. Staining of the bridge from the Peridex can also be a concern.
Figure 6: Floss under the bridge daily
So, how often should you see your patients for recall? First, I tell my patients that implants are similar to teeth. They are not a “get out of jail free” pass for hygiene. See patients a minimum of two times per year. If patients require a more frequent recall program due to peri-implant concerns or for opposing dentition, then follow that frequency. Failure to adhere to an adequate recall program is a recipe for implant failure. I am such a believer in the importance of recall that my warranty policy is dependent on patients maintaining regular recall visits.
Tips for cleaning full-arch bridges:
- It is OK to lightly scale the bridge using stainless steel or titanium scalers. Use caution not to gouge acrylic or scratch porcelain or titanium.
- Use titanium scalers to scale implants. You can very carefully use stainless steel, but it is more likely to scratch the softer titanium implant. I’ve never been able to scale anything with resin scalers. Forget those.
- You can use the side of a Cavitron tip to break up calculus on the outside of a bridge, but you must exercise extreme caution. Never use the tip; you may create stress fractures in the acrylic or porcelain.
- Use intraoral polishing burs or stones to remove tenacious calculus, and then use porcelain or acrylic polishers intraorally to polish the adjusted areas.
Should you remove the bridge to clean it? I’m not a big fan of removing a bridge unless it is absolutely necessary. If my hygienist can adequately clean the bridge and the patient can clean under the bridge, then I leave it in. This is the case most of the time. Some doctors like to remove the bridge for every cleaning, but I have three primary concerns regarding this procedure. First, frequently unscrewing and retightening a metal-to-metal fitting likely increases the risk of damaging the thread pattern in the implant. This is less of a concern with an angled abutment, but it is still a potential complication. Second, it is very difficult to remove the composite from the access holes without removing additional acrylic. Reopening the access holes regularly may lead to thinning and future fracture of the surrounding acrylic. Third, with angled abutments, most implant systems utilize a prosthetic screw that can only be taken to final torque once. After the initial metal deformation created from the first final torque, the risk of fracturing the prosthetic screw during or after retorquing increases. Most manufacturers recommend replacing the prosthetic screws every time the bridge is removed. At $40 to $50 per screw, this can greatly increase the maintenance costs to patients.
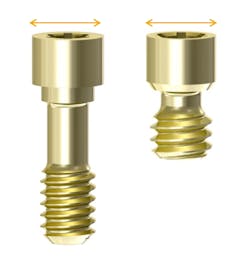
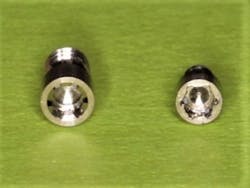
I noticed a high no-show rate in full-arch bridge recall patients who were going to need the bridge removed. My fee to remove the bridge, scale the implants, confirm tight fitting of the components, clean the bridge, and reseat and reseal the bridge is about the same as what I charge for one quadrant of scaling and root planing. This fee doubles if I have to replace the screws, so instead of quoting the approximate $250 for my services, we quoted $500 since the screws needed to be replaced. This was a problem. I have since switched to using an implant system for my full-arch cases that has a prosthetic screw that can be final torqued multiple times. I like the Access abutment by Neoss (figure 7). The prosthetic screw is the same width as the abutment screw (figure 8), and it is much stronger than the traditional multiunit abutment-type prosthetic screw (figure 9). As a result, it can be taken to final torque four times, just like an abutment screw.
Figure 7: Neoss Access abutment
Figure 8: The Neoss prosthetic screw is the same width as the abutment screw
Figure 9: The Neoss prosthetic screw (left) compared to a traditional multiunit abutment-type prosthetic screw (right)
When should you remove the bridge? Here is my protocol:
1. If the patient states that he or she cannot clean under the bridge, I remove it and adjust it.
2. If my hygienist cannot access calculus or debris under the bridge, then I remove it. Here’s a tip. If the patient develops calculus on his or her provisional, then I prepare the patient to have the bridge removed occasionally (figure 10). I notice that inaccessible calculus buildup is much more common on mandibular bridges than maxillary ones.
3. If I see radiographic calculus on an implant or angled abutment, I remove the bridge.
4. If the patient presents with suppuration from under the bridge or if I suspect peri-implantitis, I remove the bridge.
5. If the bridge is loose or damaged, I remove it.
Figure 10: If the patient builds up calculus on the provisional, assume that you will need to remove the final bridge more frequently
I hope these tips and insights will help you with maintaining your full-arch bridges. With proper care, they can offer decades of service for our patients.
John A. Hodges, DDS, FICOI, graduated from the University of Southern California Dental School in 1993. He runs a practice dedicated solely to dental implant services in Covington, Washington. Dr. Hodges lectures nationally for Neoss and Nobel Biocare on subjects including full-arch implant prosthetics, restorative complications, and Locators. He completed the fellowship program at the California Implant Institute, has restored hundreds of fixed full-arch implant restorations, is a Nobel Biocare CAD-certified technician, and is a fellow of the International Congress of Oral Implantologists. Contact him through his website.
