WRITTEN BY
Rena T. Vakay, DDS
A well-executed final impression is one of the major keys to the clinical and esthetic success of an indirect restoration. Several major factors are involved in making a successful impression: selection and proper use of the impression material, preparation design, tissue management, and oral field management. The purpose of this article is to develop an understanding of the impression material selected and the parameters of tissue management that are critical to achieving maximum esthetic results.
Impression material properties
The basis of an excellent impression begins with the selection of an impression material that has highly desirable properties: accuracy, high stability, adequate tear strength, potential for accurate multiple pours, ease of handling, and elasticity. Impression materials with these properties are the elastomers.1 The elastomeric impression materials currently available are polyethers, polyvinyl siloxane (addition silicone), and polysulfide. Polyvinyl siloxane (PVS) has exhibited the most accuracy, excellent stability, and the best elasticity of the elastomers. Due to these excellent properties, PVS has become the material of choice for a majority of crown and bridge impressions.2
Polyvinyl siloxane also has a few disadvantages which cause frustration even among the most experienced clinicians. These disadvantages3 are: high cost, short working time, hydrophobic properties, interaction with some latex gloves, and low tear strength.
Short working time may prevent achieving proper detail of the preparations. Voids may be created due to need for increased speed of mixing and insertion. Separation of the light and heavy body material in the one step/double mix impression may also occur if time is constrained, resulting in a poor impression and compromised restorative results. Some manufacturers have suggested refrigeration of the material to extend the working time.
PVS materials are hydrophobic, so a dry field is very important. Ionic surfactants have been added to some PVS materials to make the impression material hydrophilic, but it is not truly hydrophilic. A dry field is still necessary for this material despite the improvement.4
The use of latex gloves may inhibit polymerization of certain polyvinyl siloxane impression material.5 By interfering with the setting reaction, the PVS impression will lack accuracy and stability. Caution should be taken not to touch the preparations or the impression material during the impression, with latex gloves.
The low tear strength is of most concern at the marginal area of preparation in the impression, where the material may be thin and fragile.6 Possible tears in the impression at the margin may result in an inadequate seal of the restoration and recurrent decay. Insufficient coverage of the preparation’s finish line will also compromise the esthetics by making the margin visible.
Dentogingival complex
A comprehensive examination and thorough diagnosis is critical to determine the health of the periodontium prior to beginning a restorative treatment plan. When preparing the teeth for restorations, it is desirable to begin with excellent normal periodontal health. This ensures not only an excellent, predictable impression, but also an excellent, predictable final result. Normal healthy gingiva that has been displaced during the impression will return to normal position shortly after the treatment is completed. The laboratory may design the restoration predictably knowing that the resultant gingiva will be in the correct place.
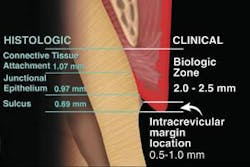
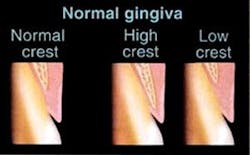
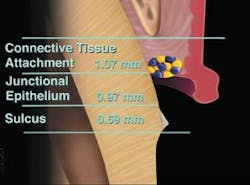
To understand what normal and healthy gingiva is, we must understand the dentogingival complex (Figure 1)7 and its relationship to the surrounding osseous crest. The osseous crest relationship levels are divided into three categories based on the osseous level: normal, high, and low crest (Figure 2). 8,9
Osseous crest levels
In normal healthy gingiva, the position of the osseous crest in the anterior dentition is 3 mm from the facial free gingival margin and 4 mm from the interproximal free gingival margin. This measurement should be made using a flat-ended periodontal probe and anesthetized tissue. The tip of the probe is placed in contact with the tooth and guided down into the tissue, while keeping in contact with the tooth. The tip of the probe will meet resistance as it is pushed into the connective tissue attachment. This causes discomfort if the patient is not anesthetized. This procedure is called sounding to bone.10 Sounding to bone measures the entire dentogingival complex or biologic width.
The dentogingival complex is comprised of three histologic components: connective tissue attachment, the junctional epithelium, and the depth of the gingival sulcus.11 If the measurement is 3 mm facially from the facial free gingival margin to the osseous crest and 4 mm interproximally, the dentogingival complex is considered normal crest. Osseous crest position is the key critical piece of information needed to diagnose the status of the periodontium. The position of the bone enables the clinician to predict the final outcome of the tissue esthetically during restorative procedures. The tissue must be supported by the osseous crest to reestablish normal biologic width.
Lack of bone for normal support, as in the low crest situation, makes it very difficult to achieve a predictable outcome after impression-making. In low crest, sounding to bone is greater than 3 mm on the facial and greater than 4 mm in the interproximal. The low crest bone situation in the anterior dentition with thin biotype is most susceptible to the esthetic problems of recession and black triangles. Patients may also complain of unsightly margins and uncontrolled saliva being expressed through these spaces during speaking.
In the high osseous crest relationship, there is more than adequate osseous support for the gingival tissue. An example may be altered passive eruption. Sounding to bone results in a facial measurement that is less than 3 mm and an interproximal measurement less than 4 mm. Deflection of the gingival tissue is difficult and may be traumatic during impression-making. The restorative result is often the placement of the margins of the restoration too close to the osseous crest. The tissue will remain inflamed and red indefinitely around this restoration. This is called “violation of biologic width.” Violation of the interproximal bone is responsible for the violation of biologic width, not the facial.12 Surgical correction and a new restoration is needed to correct the esthetic problem.
Tissue management
The two-cord retraction technique is still one of the most predictable methods for managing the tissue for final impressions when using polyvinyl siloxane.13
Here are some advantages:
➊ This technique can be easily modified for use in all three levels of osseous crest by changing the number of pieces of cord and the size of the cord used.
➋ Cord is helpful in the management of sulcular fluid and hemorrhage, especially when using a hydrophobic impression material.
➌ Placement of retraction cord for a minimum of four minutes is a predictable way to get an optimum crevicular width around the preparation margin to assure resistance to tearing and distortion.14
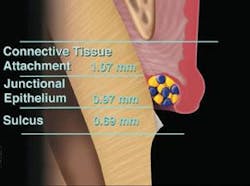
In a normal crest osseous situation, the primary cord, Ultrapak 00 [Ultradent Products, Inc., South Jordan, Utah, (800) 522-5212], is placed (Figure 3). The tissue will be displaced easily so that you can extend the finish line of the preparation to the coronal portion of the cord. This will position the margin of the indirect restoration about .5 mm below the margin of the free gingiva.
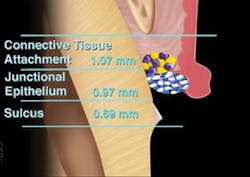
Ferrous subsulfate may be syringed on top of the cord if needed to control hemorrhage. A second, larger cord is placed, such as the Ultrapak size 0 or 1. The cords remain in position for a minimum of four minutes to create optimum crevicular width (Figure 4). During this time, the preparation may be cleansed by using microabrasion and thoroughly rinsing with water. Immediately before the impression, the secondary cord is removed (Figure 5). The primary cord is left in place to block seepage in the crevicular area. The crevicular area should be evaluated for absence of hemorrhage, debris, sulcular fluid, or collapsed tissue on the margins. The impression may be taken if the crevicular area is clean, dry, and uniformly deflected. Once the impression is placed, it is important to allow the material to set completely to avoid distortion or tearing of the material. Once the impression is set, the impression should be evaluated for quality. The primary cord is then removed.
Diagram of secondary cord removed immediately before final impression
In low crest bone, caution must be exercised to minimally displace the free gingival tissue. Only one cord should be used, preferably a 000 or 00. The cord is placed with gentle pressure. This tissue is the most sensitive to black triangles and recession. The patient should be advised of the high esthetic risk for this type of osseous crest situation, since it is unstable.
In the high osseous crest situation, only one cord will be used if it is to remain stable. The tissue is most susceptible to violation of biologic width. The margin of the restoration is easily placed too close to the osseous crest in this situation.
Conclusion
Today we are faced with many options for final impression choices. Polyvinyl siloxane is currently the best impression material for predictable accurate results.
The clinician must properly diagnose the periodontal situation and treatment plan so that the material and techniques may be modified to compensate for the disadvantages that may hinder us in achieving the best esthetic results for our patients. ■
The author extends her sincere gratitude to Dr. John C. Kois for the diagrams shown within this article as well as the contributions and impact his teaching has made to dentistry.
References
1 Dental materials and their selection. William J. O’Brien, ed. 3rd edition, Chicago: Quintessence Co., Inc., 2002; 90-112.
2 Paquette J, Sheets CG. Mastering the impression technique for simple to complex treatments. Dentistry Today; 19:6:69-72.
3 Council on Dental Materials, Instruments, and Equipment. Vinyl polysiloxane impression materials: a status report. J Am Dent Assoc. 1990; 120:595-598.
4 Chee WL, Donovan TE. Polyvinyl siloxane impression materials: a review of properties and techniques. J Prosthet Dent 1992; 68:728-732.
5 Kahn RL, Donovan TE, Chee WL. Interaction of gloves and rubber dam with a poly (vinyl siloxane) impression material: a screening test. Int J of Prosthet 1989; 2:4:342-346.
6 Perakis N, Belser UC, Magne P. Final impressions: a review of material properties and description of a current technique. Int J Periodontics Restorative Dent 2004; 24:109-117.
7 Gargiulo AW, Wentz FM, Orban BB. Dimensions and relations of the dentogingival junctions in humans. J Periodontol 1961; 32:261-267.
8 Kois JC, Vakay RT. Relationship of the periodontium to impression procedures. Compend Contin Educ Dent 2000; 21:684-688.
9 Coslet JG, Vanarsdall R, Weisgold A. Diagnosis and classification of delayed passive eruption of the dentogingival junction in the adult. Alpha Omega 1977; 70:24-28.
10 Kois JC. Altering gingival levels: the restorative connection. I Biologic Variables. J Esth Dent 1994; 6:3-9.
11 Vacek JS, Gher ME, Assad DA, et al. The dimensions of the human dentogingival junction. Int J Periodontics Restorative Dent 1994; 14(2):154-165.
12 Kois JC. The gingiva is red around my crowns - a differential diagnosis. Dent Econ 1993; 83 (4): 101-102.
13 Kois JC. Impression protocol. Creating restorative excellence. Presented at: Center for Advanced Learning Seminar Series: Mentor Update, August 2004; Seattle, Wash.
14 Baharav H, Laufer BZ, Ganor Y, et al. The effect of displacement time on gingival crevice width. The Int J of Prostho 1997; 10: 248-253.
Rena T. Vakay, DDS
Dr. Vakay is an accredited member of the AACD. She specializes in restorative and cosmetic procedures that enhance long-term function and esthetics. Dr. Vakay is also a fellow of the AGD and has achieved Mentor status at Creating Restorative Excellence. Contact her at [email protected].

