Esthetic procedures update
By Kevin Winters, DDS
Welcome to this new series within Dental Equipment & Materials — "Esthetic Procedures Update." I will try to bring you some very interesting cases that exhibit real esthetic challenges. We'll discuss the techniques involved, as well as the materials and treatment planning needed to get these cases to turn out beautifully and predictably.
Esthetic dentistry has come a long way from the days of Nuva-Fil and Scotchbond. Today's materials are so much more advanced, it is like comparing the Model T to a Lexus — both get you where you want to go, but there is a big difference in how you get there.
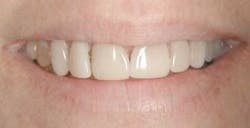
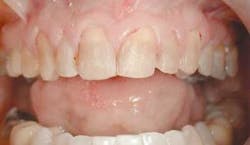
A patient came to my office (fig. 1) with some legitimate esthetic concerns. She had feldspathic porcelain veneers done 16 years ago in an effort to cover dark tetracycline staining. The patient reported being very satisfied with the outcome at the time. However, as time passed, the smile she once felt so good about began to make her feel self-conscious again.
null
After spending time with the patient to find out what her real desires were, we proceeded to the examination room. The examination consisted of a complete intraoral exam, periodontal evaluation, TMJ exam, radiographic exam, and esthetic evaluation. Models, pictures, and a bite also were taken.
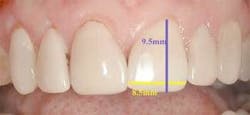
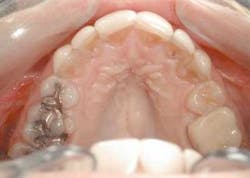
From this information, we are able to ascertain many things. First, after ruling out any periodontal disease and noting a comfortable and asymptomatic TMJ, we can turn our attention to the esthetic concerns. As you can see in figure 2, there are many things that can be improved. Let's go through this very methodically, using principles taught by the experts in the field, and see what we can improve.
null
As taught at the Las Vegas Institute, there is an evaluation technique called S.M.I.L.E.S. that allows us to critically observe a smile.
S – Size and Golden Proportion
Here we look at the width-to-length ratio, widely accepted to be most desirable when it is between 75-80 percent. We also look at the Golden Proportion, which compares the ratio of the widths of the teeth. Using the lateral as a unit of one, the central should be 1.6 times as wide. The cuspid, only the visual part of it from the anterior, should be .6 times as wide.
null
With our patient, this evaluation reveals the centrals to be approximately 8.5 mm wide and 9.5 mm long. (Fig. 3) This would make the existing W/L ratio 89 percent. The Golden Proportion evaluation shows that the centrals appear too wide and we see too much of the canines.
M – Midline and Canting
Here we look at the dental midline as well as the facial midline. Also, is the smile canted to one side? What we found was that the dental midline is slightly off. When you look more closely, tooth #9 is slightly overlapping giving the appearance of the midline being off.
I – Axial Inclination
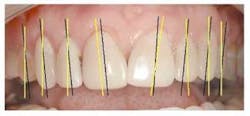
For the most visually pleasing effect, the teeth should have a slight mesial axial inclination. The observation of our patient's teeth reveals inclinations that do not follow this rule (Fig. 4 – black lines are desired; yellow lines existing).
null
L – Lip line vs. Incisal edge of teeth
Here we want to evaluate the curvature of the incisal edges compared to the lip. These edges should follow the basic curve of the lower lip. It should not be flat or reversed. This ages the smile tremendously. Our patient's incisal edges follow her lip fairly well. (Fig. 2)
E – Extra hard-tissue guidelines
We check several areas here. One is the contact points of the teeth. Do they show a proper gingival migration as the teeth progress posteriorly? We also look to see if the teeth themselves follow the proper gradation as they go posteriorly. The arch form is important as well. Is it nice and broad or more V-shaped? Is it equal on both sides?
S – Soft-tissue conditions
Beautiful teeth need great supporting tissues. If they are surrounded by tissue that detracts from this appearance, your end result will be compromised. Gingival symmetry is important. Gingival heights and contours are important. Having the gingival zenith in the proper position is important. The gingival heights should be arranged where the centrals and canines are equal and the lateral is about 1 mm incisal to this line.
The gingival zenith of the centrals should be just distal to the midline, directly on the midline for the lateral and just slightly mesial to the midline for the canine.
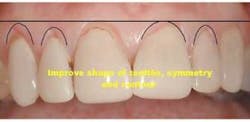
In fig. 5, we can see how our patient presents before we begin our treatment. Using the guidelines above, we can now see what corrections we need to make.
null
After going through this very detailed analysis, we should now just look at the obvious visual improvements that need to be made — things such as color, the width of the smile, and how it fits the patient's face.
Our patient desired a vast improvement in the color of her teeth. We can all agree these teeth are rather dark and detract from the beauty of her smile. Part of the reason is due to the underlying tetracyline staining of the teeth. The other reason is simply that there were not enough teeth prepared to significantly change the color.
null
One of the most common mistakes dentists make when providing porcelain veneers for their patients is to do six teeth, canine to canine. I have always wondered why this trend was started. Obviously, smiles do not stop at the canines. As a result, the majority of these cases will exhibit a "negative" buccal corridor, meaning the sides of the smile will appear darker. There is no width to the smile. It can look like the teeth "sink in" lingually.
The only time I can think of where six veneers would be acceptable would be if you are not changing the color of the teeth, just the shape. Many times, if that is the case, four veneers will work as well or better. However, if you plan on lightening the color, which most people want, the esthetic outcome will be greatly enhanced if you do eight, 10, or 12 teeth. Actually, the "scientific" way to determine how many teeth should be involved is to just count how many teeth show when the patient smiles.
null
It is important to have the patient guide us when it comes to color. Inflicting our own biases on color selection can result in a case we may find pleasing but the patient does not like. After all, they are the ones who are paying and we are obligated to provide them with a color they want. Typically this means we might have to make veneers lighter than what we may consider "natural," but that is what the public wants.
In our case, the patient wanted light but still natural. We are going to use a Chromascop 110 shade and bleach the lower teeth. This will provide a blend of colors that will allow the maxillary teeth to be lighter than the mandibular teeth. Fortunately, when she smiles and talks, very little of her lower teeth show.
null
Now that we have gathered our information, the next step in the process is to communicate with our lab technician. This is vital to the success of the case. Technicians can only do so much. They must have our help and need every bit of information we can provide. Based upon our prescription, the technician can return to us an ideal wax-up, reduction guides, temporary matrices, and incisal-edge placement guides. This reduces stress and makes the preparation appointment go much smoother.
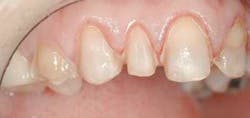
Upon anesthetizing the patient, I decided to remove the old veneers to observe the underlying teeth. I was able to observe the old preparations and the actual color of the teeth. This information will help me with my new preparations (Fig. 6).
null
We found some severely tetracycline-stained teeth that had hardly any preparation. The result was thick teeth (Fig. 7). This is the main reason the ceramist was not able to correct many of the nuances of the smile design we discussed earlier. Adequate preparation is the only way to obtain a fantastic result.
After first placing depth-cutting grooves to gauge our facial reduction, the remaining enamel is removed. Basic design guidelines for this case include at least .6 mm facial reduction done in three planes, interproximal reduction to allow for correction of inclinations and discrepancies in tooth size, and margin placement right at the gingival crest.
null
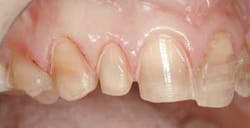
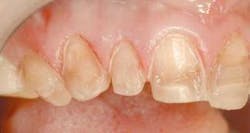
Once the basic preparations were complete, it was evident that the dark bands of tetracycline stain could have a negative effect on the final color (Fig. 8). In a situation like this, I have decided to remove this band and replace it with a lighter-colored microhybrid composite. After removing approximately 1.5 mm of additional dentin (Fig. 9), I etched with 35 percent phosphoric acid for 10 seconds, rinsed with water leaving a moist surface, and placed OptiBond Solo Plus. Point 4 composite was applied in a shade that provided more value to the tooth. Final preparation was then completed which removed another .4 mm of facial tooth structure to allow the thickness of porcelain to help block the shade of the stump (Fig. 10). Not shown in the picture was the final "opening" of the interproximal enamel at the gingival margin. I did this to allow for better contour and access for hygiene.
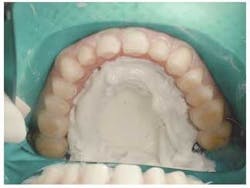
We are now ready for the impression. After scrubbing and rinsing with Consepsis to clean the teeth, a full-arch impression using Aquasil was obtained. Next, a bite registration, stump shade, and a "stick" bite to reference the horizontal and vertical planes was accomplished.
null
Using a matrix made by the laboratory from an ideal wax-up, the patient's teeth were temporized with Luxatemp. This allowed us to verify the proposed case in many ways. Size and shape of teeth, incisal edge position, approximate color, and others are all benefits of custom temporaries.
When the case arrives back from the lab, I always evaluate it on the models checking on fit, shape, and color. Now, it is time to place the new sculptures on the teeth.
null
Again, we anesthetize and remove the temporaries. The veneers are tried in three at a time checking margins and contacts. As you move forward, simply replace a veneer on one side and add a new one to the other. Do this until all veneers have been tried in. If everything fits properly, you are now ready to evaluate the color. For this case, I used the 3M Veneer Cement system. Using the water-soluble try-in paste, you and the patient can now evaluate the color of the veneers.
Since we are using Empress, ingot selection in a tetracycline case is critical. These teeth were dark, but not extremely so. We used an 01 ingot with a 110 shade. For the cement shade, I selected B 0.5. This helps to increase the value a bit and ends up with a nice color.
null
Placing the veneers will be done with a technique called "rapid cementation." This technique utilizes a rubber dam and other aids to assure complete and total isolation for an optimal bonding environment (Fig. 11). Once the teeth are isolated and cleaned, then the same etch, rinse, and bonding agent sequence is done. The veneers are prepared by cleaning them with phosphoric acid, rinsing, and applying Kerr Silane — a combination of silane with a resin primer already in it.
Next, beginning with the centrals, the resin cement is applied to each veneer and placed on the teeth. Using a rubberpoint, clean and remove excess cement, then use a small tacking tip at the gingival margin to tack the veneer in place. At this time, floss may be carefully used interproximally. The lateral and canine are next. Using the same sequence, these veneers are attached. Repeat this until all veneers are tacked into place.
null
Once cleanup and tacking is done, proceed to final curing. I like to get at least 20 seconds per surface using the Optilux 501. To remove the final flash or cement, a #12 blade works very nicely.
Occlusion is verified and then all margins receive a final polish.
null
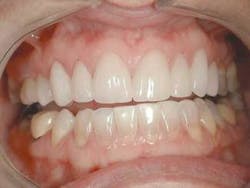
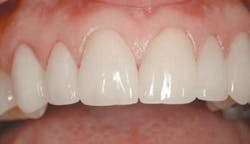
The final result of this case sees an improvement in all of the original objectives (Figs. 12, 13, 14). Our patient wanted a lighter, wider smile that would cover the darkness she had lived with her entire life. Needless to say, she was ecstatic with the end results (Figs. 15, 16).
null
Esthetic dentistry becomes predictable when proper planning is used. Patients who spend large amounts of money to improve their smiles deserve our best efforts. No one plans to fail, but many times we fail to plan.
Dr. Kevin Winters graduated from the University of Missouri-Kansas City in 1989. After completing a GPR at the University of Louisville-Humana Hospital, he opened a general practice in Claremore, Okla. After developing a successful general practice and being awarded the Young Dentist of the Year award in 1995, Dr. Winters transitioned his general practice to one that concentrates on esthetics and reconstruction. Dr. Winters is one of the original clinical instructors at the Las Vegas Institute. He also lectures and conducts seminars across the nation. Dr. Winters may be reached at (918) 341-4403 or by e-mail at [email protected].


