Implants made simple: Part II
Implants have been placed in your patient’s mouth. Healing time has passed and the restoration is ready to be made. What’s the next step? How do you proceed? The steps required to complete the restoration are easy and painless if the proper protocol is followed. In Part I, we covered case planning, CT scan stents, and surgical stents. If all the steps have been followed, then the next steps are just as simple.
Depending on the type of restoration constructed, procedures may vary. A single tooth implant, for example, is a vastly easier and less time-consuming procedure than a full-mouth reconstruction. For this reason, we will cover the preliminary steps of a more complex, full-mouth reconstruction, whether it is screw-retained, cemented, or a patient-removable appliance.
Read Part I on DentistryIQ.com.
Step I: Case design
If a full arch is being restored and many implants have been placed, a few questions need to be asked. Are there as many implants as previously planned? Were the implants placed where they were expected to go? What was the desired result and can it still be achieved? Is there enough vertical room?
Most of these questions can be answered by sending upper and lower alginate impressions with a quick bite to the lab. Usually the study models will show the healing abutments placed after the implants were uncovered. The lab will mount the models and trace the line angles of the implants by eye or with a quick mock setup. In most cases, this is enough to determine if the original plan is still feasible.
Step II: Custom tray
A final impression is required to proceed with the case. The lab will construct one of two styles of custom trays — either an open-top or closed-top tray will be made.
In either style of impression procedure, the first thing to do is remove the healing caps. Place the impression copings on top of the implants, one at a time. Be especially careful not to remove all of the healing abutments at one time. In the time it takes to place the individual impression copings, the tissue can start to shrink around the implants. Turn the entire impression coping clockwise on top of the abutment. The impression coping will screw into the abutment. Tighten with finger pressure. If it is too slippery, you can use a dental dam to get a better grip. When completed, the impression coping will be flush to the base of the abutment. Take an X-ray to confirm that the impression coping is fully seated.
If you are using a closed-top tray, fill the tray with impression material. Use something hard and elastic. Do not use rubber-based impression material. Inject some material around the impression coping. Place the tray into the mouth. After the material hardens, remove the impression from the mouth. Remove the impression coping and replace the healing abutment. Send the impression coping back to the lab with the impression
With an open-top tray, use pattern resin to connect all the impression copings after they are screwed down. When completed, the resin will be around the middle of all the impression copings, joining them all in one piece. This technique may not be possible because of the non-parallelism of the male hex of the implants. You may just want to connect in groups of two. If this looks totally impossible, just leave the individual impression copings.
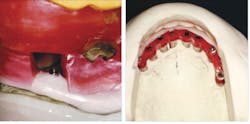
One obstacle you need to be aware of is that the guide pins supplied by the manufacturer may be too short. Place the open-top tray in the mouth to see where the pins come out. If the pins are lower than the tray, place a ball of wax on top of the pins. If the pins are higher than the tray, leave them as they are. Place wax over the open top of the tray, and fill the tray with impression material. Place the tray into the mouth. Some material will ooze out of the open top. As the material hardens, clear away the material to gain access to the balls of wax. After it is hard, cut away the excess and pluck out the wax. Unscrew the guide pins, remove the impression from the mouth, and replace the healing abutments. Send the impression and the guide pins to the lab for a master model.
For single-tooth and small bridges, a regular stock tray can be used. Follow all the same procedures as explained. If the open-top tray technique is used, just cut a hole in the plastic tray above the implant.
Step III: Stabilized bite rim
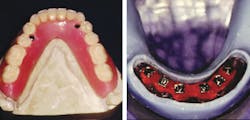
The stabilized bite rim engages one, and occasionally two, abutments. The bite rim is made on the master model. Before proceeding to the mouth, examine the bite rim on the model. An impression coping is cut in half and connected by acrylic to the tray. Look at which implant the impression coping (or copings) on the bite rim engages. Remove the healing cap that is in the mouth at the same location, using the same technique referred to in the impression-taking step. No other healing caps need to be removed. Place the bite rim into the mouth.
The bite rim is both tissue-supported and implant-supported. The cut-down impression coping will lie on top of the abutment. Screw in the enclosed guide pin to hold down the impression coping. Take your bite in the same manner you would a normal bite rim. Mark the mid-line, lip-line, etc. as you would a normal bite rim.
Unscrew the guide pins. Remove the bite from the mouth. Replace your healing caps, and send the models to the lab for the next step.
Step IV: Set-up
This is possibly the single most important visit for any full-mouth rehabilitation restoration case. Frames can be reordered and porcelain adjusted, but a wrong bite and incorrect esthetic starting point cannot be reversed.
The set-up for the final case must be tried in before proceeding with the metal framework. The set-up uses the stabilized bite rim. The procedure to try in this set-up is the same as the bite rim procedure. An impression coping is cut in half and connected by acrylic to the tray. Which implant do the impression coping or copings on the set-up engage? Remove the healing cap that is in the mouth at the same location, using the same technique referred to in the impression technique. No other healing caps need to be removed. Place the set-up into the mouth. The set-up is both tissue-supported and implant-supported. The cut-down impression coping will lie on top of the abutment. Screw in the enclosed guide pin to hold down the impression coping. Try in your set-up in the same manner you would a normal set-up. Check the bite, vertical, lip line, smile line, shade, etc., as you would with a normal set-up.
Show the patient what the esthetics will look like for the final restoration. Whether the final case will be porcelain-fused-to-metal or processed denture tooth, this set-up is a good indication of what the final case will look like. If the implants are angled out too buccally or the placement is too far buccal, it will be indicated on this set up, thus enabling a patient to see the shortcomings of the final restoration. It is at this point that the lab can advise on the final restoration and give possible solutions to problems. It is very important for the doctor, patient, and lab to agree on the esthetics and any mechanical concerns before proceeding with the case.
A rubber index or stone index is now made to measure the angles of the implants and the vertical height of the opposing dentition in relation to the implant. For all intent and purposes, if the model is 100% verified, the entire case could be completed at the next visit, though this is not advised. The importance of this visit cannot be stressed enough. In some instances after the set-up has been tried in and verified and the final frame made, a new bite is taken to complete the restoration. The only problem is that the new bite may be many millimeters higher or lower than the original, thus making the frame incorrect and useless. In the case of being a more open bite, there would be three to five millimeters of unsupported porcelain. In the case of closing the bite, there is not enough room between the metal and the porcelain or acrylic.
Step V: Verification jig
A final preparation step is the verification jig. Either impression copings or temporary cylinders will be connected with a rigid resin material. The purpose of this jig is to mimic the final frame in fit. The jig is placed on the model and in the mouth to verify the accuracy of the model. If the jig does not fit the mouth, the model is incorrect. The jig must be cut and reconnected in the mouth. The model is then modified, or a second verification model is made. This step guarantees a properly fitting final frame and avoids the expense and time required for solder pick-up impressions and solder connections.
Once these steps are performed and proper protocols are followed, you will have all the information necessary to start the final restoration. As mentioned in the previous article, measure twice and restore once proves that pre-case planning can truly make implants simple.
------------------------------------------------------------
ALSO BY STEVEN PIGLIACELLI:
Top 5 questions you should ask a dental lab before you send them a case
The fall and rise of dental technology
The changing face of dentistry
-----------------------------------------------------------


