Upperoriginal

Rapid-fire questions, rapid-fire answers

June 7, 2010
Dr. Richard E. Mounce answers eight clinically relevant questions with the goal of aiding general practitioners in performing routine endodontic treatment. He emphasizes early referral, achievement and maintenance of apical patency, and enhanced visualization and magnification.

By Richard E. Mounce, DDS

A number of clinically relevant questions are discussed in this column with the goal of aiding general practitioners in performing routine endodontic treatment.

1) Does it matter what sealer is used in obturation?

The short answer is no, as long as the clinician is not bonding the obturation and if gutta percha is being used as the core obturation material. Gutta percha does not bond to any of the commercially available sealers. As a result, gutta percha can be used with virtually any type of sealer. This said, it could be argued that there is benefit to using resin-based sealers for the purpose of bonding the sealer to the wall of the canal after the smear layer has been removed.

If the clinician is using a bonded obturation product (such as RealSeal*), the sealer is chemically matched to the core material (RealSeal Sealer SE — self-etch). With RealSeal, the methacrylate component of the sealer is chemically bonded with the methacrylate component of the RealSeal master cone or RealSeal One Bonded Obturator.* In essence, with bonded obturation there is a continuous bond of the material from the core obturation material through the sealer into the dentinal tubules.

The use of bonded obturation provides a clinically relevant advantage over gutta percha. Gutta percha requires a coronal filling to protect it from microbial contamination. Gutta percha and sealer exposed to microbial contamination allow the movement of bacteria along the canal from the crown to the apex if given enough time (days to weeks). Alternatively, both in vitro and in vivo, bonded obturation in the form of RealSeal* has been shown to resist coronal leakage in a statistically significant manner relative to gutta percha.

2) Does it matter how sealer is placed?

No, with several caveats. I use the Skini Syringe with Navi tips (Ultradent, South Jordan, UT). The Skini Syringe and Navi tips are simple to use and allow precise sealer placement. Sealer can also be placed using a master cone, paper point, and a warm carrier-based “size” verifier among other methods. Using lentulo spirals to place sealer can easily fracture and are often challenging to remove.

Regardless of how it is placed, sealer should not be the primary filling component. The core obturation material (either gutta percha or RealSeal) is the primary filling component. Only enough sealer to lightly cover the canal walls with a minimum sealer film thickness is needed. Sealer should only take up the gaps between the core obturation material and the canal wall. Ideally, these gaps should be minimal, if present at all, with ideal obturation techniques.

If the apical foramen is relatively open (a size #40 ISO tip size or larger), the potential for excessive extrusion of sealer and core material exists, especially if the obturation is a warm gutta percha or RealSeal technique, underscoring the importance of placing only enough material to provide a minimum sealer film thickness.

3) Does it matter what obturation technique I use?

Clinical success can be achieved with a number of obturation techniques — cold or warm, master cone-based or obturator-based, among other variables. The above notwithstanding, using cold lateral condensation as an obturation technique does not allow master cones to be condensed into prepared canal anatomy. Clinically, this means that the apical half of many laterally condensed canals are, in essence, single-cone root canal fillings. Alternatively, warm techniques intentionally move sealer and the core obturation material (either gutta percha or RealSeal*) into the various cleared ramifications of the prepared root. The use of warm techniques more predictably achieves the goal of endodontic obturation: to three-dimensionally fill all of the ramifications of the canal space and prevent the movement of bacteria (provide apical seal) along the length of the canal. Any step-back from this ideal (three-dimensional obturation) compromises long-term clinical success, as it leaves greater potential for unfilled space within the root canal’s system.

4) Does it matter if I use an obturator or master cone for obturation?

There is abundant evidence in the endodontic literature, using Thermafil (Dentsply Tulsa Dental, Tulsa, OK) as an example, to prove that carrier-based obturation provides a clinically acceptable obturation relative to other noncarrier-based delivery systems. Both materials have their clinical application.

I use both RealSeal One Bonded Obturators* (warm carrier-based bonded obturation product) and RealSeal* master cones based on personal preference in any given clinical case. Both of these materials create a bonded obturation that provides resistance to coronal leakage relative to gutta percha.

RealSeal One Bonded Obturators* possess several features not shared by other warm carrier-based devices: they are dissolvable in chloroform, they can be shredded with the .08/25 Twisted File* at 900 RPM, and they create a bonded obturation with the aforementioned benefits. In essence, with chloroform and the Twisted File, RealSeal One Bonded Obturators can be easily removed from the canal.

What matters far more in terms of obturation quality is how the master cone or warm carrier-based device is used. If the MC is respected, if the canal shape and master apical diameter are optimized, and if the quality of disinfection is high, it is possible to obturate canals to a high standard with either warm carrier-based devices or master cones.

5) How do I locate a calcified canal?

The primary tool for the location of calcified canals is the surgical operating microscope (Global Surgical, St. Louis, MO), and as a secondary option, loupes (4.8x HiRes, Class IV Orascoptic, Middleton, WI) are immensely helpful. Access must be centered in the long access of the root, a task that is made much simpler with the aforementioned magnification and visualization. Noting the depth of dentin removal as well as the buccal to lingual and mesial to distal position during access is essential to remain centered in the long axis of the root. The color of the dentin should be observed at all times to discern the previous canal space from the lateral root wall dentin. Any time you are unsure of the position of the canals, radiographs from various angles should be taken to redirect the access. If you are at the cervical root level (crestal bone) with or without magnification and the canal has not been located, the case should be referred.

6) How do I manage a calcified canal?

Referral is always an excellent option unless you are certain that the given clinical case is within the scope of your skills, equipment, and time. If you keep the case, first it is essential to achieve and maintain patency. Personal choices vary as to whether carbon steel hand files or files designed for stiffness should be used to explore calcified canals. In any event, once the canal is located, the first hand K file that will navigate a severely calcified canal is usually the #6 hand K file. Ideally, this #6 is precurved and gently inserted repeatedly until it reaches the estimated working length. This often requires multiple insertions at various angles to allow apical insertion, especially when curvature is present in addition to calcification.

Irrigation is copious during this process. The clinician should focus on getting the #6 to spin freely at the apex before trying to use a #8 hand K file. Using the #8 hand K file in a similar fashion, it is also inserted and used until it spins freely at the apex. The #10 follows the #8 hand K file. Using this sequence, when a #15 hand K file spins freely at the apex, the canal is ready for preparation with rotary nickel titanium files.

The M4 Safety Reciprocating Handpiece Attachment* can make this process more efficient relative to performing these steps by hand. The M4 reciprocates a hand K file 30 degrees clockwise and then 30 degrees counterclockwise. This action replicates the manual action used to shape canals with hand K files. The M4 is inserted in an E-type coupling at 900 RPM at the 18:1 setting in a 1 mm to 3 mm vertical amplitude for approximately 15 to 30 seconds per hand file size. The hand K file is placed into the canal, under the rubber dam, to the true or estimated working length, and the M4 placed onto the hand K file. Once the given hand K file has been reciprocated for 15 to 30 seconds, the canal is irrigated and the next larger hand K file size is placed in the canal and the process repeated. M4 reciprocation is safe, efficient, and saves time as well as hand fatigue.

7) To what size should canals be instrumented?

The endodontic literature is conclusive in that larger apical preparations create cleaner canals. In essence, a #50 master apical diameter will create a cleaner canal than a #30 master apical diameter. With larger apical diameters, the cleaner canal results from greater volumes of irrigation reaching the apex, improved irrigant hydraulic flow, and greater effectiveness of irrigant activation. It is especially important to instrument necrotic canals to enhanced apical diameters since necrotic canals are much more challenging to disinfect relative to vital inflamed canals.

Methods to determine the ideal master apical diameter are empirical. One method is to gauge the apex. The hand K file that binds at the MC (TWL) represents the initial diameter of the MC. The clinician can instrument the tooth between three and six sizes larger than the first hand K file size that binds at the MC. It should be noted that the files used to prepare the larger apical diameter should be taken to the MC and not beyond. Taking RNT files beyond the MC risks apical transportation and other preventable iatrogenic events.

8) When should I refer a case?

It is inherently unprofitable to access cases that are not completed. If you have the time, skills, will, equipment, and training to finish the case, then do so. Starting every case that presents itself in lieu of referral is highly problematic. The iatrogenic events that can ensue may not be retrievable and lead to destruction of tooth structure and/or loss of a tooth that could otherwise be avoided entirely by correct initial management. While a comprehensive discussion of case complexity is beyond the scope of this article, the more calcified, curved, long, short, atypical, and/or resorbed the roots are — among a host of other factors — the greater the indication for referral. There is only one best chance to bring any given endodontic case to a successful conclusion. I believe the best assessment of case difficulty and the necessity for referral is to ask oneself, “If the patient were my mother, would I start this root canal?”

A number of clinically relevant questions have been answered here. Emphasis has been placed on early referral, achievement and maintenance of apical patency, and enhanced visualization and magnification. I welcome your feedback.

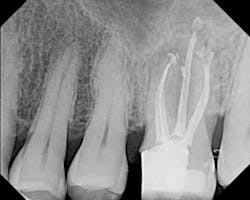
Fig. 1 — Clinical case instrumented with Twisted Files* and obturated with RealSeal One Bonded Obturators.*

By Richard E. Mounce, DDS A number of clinically relevant questions are discussed in this column with the goal of aiding general practitioners in performing routine endodontic treatment. 1) Does it matter what sealer is used in obturation? The short answer is no, as long as the clinician is not bonding the obturation and if gutta percha is being used as the core obturation material. Gutta percha does not bond to any of the commercially available sealers. As a result, gutta percha can be used with virtually any type of sealer. This said, it could be argued that there is benefit to using resin-based sealers for the purpose of bonding the sealer to the wall of the canal after the smear layer has been removed. If the clinician is using a bonded obturation product (such as RealSeal*), the sealer is chemically matched to the core material (RealSeal Sealer SE — self-etch). With RealSeal, the methacrylate component of the sealer is chemically bonded with the methacrylate component of the RealSeal master cone or RealSeal One Bonded Obturator.* In essence, with bonded obturation there is a continuous bond of the material from the core obturation material through the sealer into the dentinal tubules. The use of bonded obturation provides a clinically relevant advantage over gutta percha. Gutta percha requires a coronal filling to protect it from microbial contamination. Gutta percha and sealer exposed to microbial contamination allow the movement of bacteria along the canal from the crown to the apex if given enough time (days to weeks). Alternatively, both in vitro and in vivo, bonded obturation in the form of RealSeal* has been shown to resist coronal leakage in a statistically significant manner relative to gutta percha.2) Does it matter how sealer is placed? No, with several caveats. I use the Skini Syringe with Navi tips (Ultradent, South Jordan, UT). The Skini Syringe and Navi tips are simple to use and allow precise sealer placement. Sealer can also be placed using a master cone, paper point, and a warm carrier-based “size” verifier among other methods. Using lentulo spirals to place sealer can easily fracture and are often challenging to remove. Regardless of how it is placed, sealer should not be the primary filling component. The core obturation material (either gutta percha or RealSeal) is the primary filling component. Only enough sealer to lightly cover the canal walls with a minimum sealer film thickness is needed. Sealer should only take up the gaps between the core obturation material and the canal wall. Ideally, these gaps should be minimal, if present at all, with ideal obturation techniques. If the apical foramen is relatively open (a size #40 ISO tip size or larger), the potential for excessive extrusion of sealer and core material exists, especially if the obturation is a warm gutta percha or RealSeal technique, underscoring the importance of placing only enough material to provide a minimum sealer film thickness. 3) Does it matter what obturation technique I use? Clinical success can be achieved with a number of obturation techniques — cold or warm, master cone-based or obturator-based, among other variables. The above notwithstanding, using cold lateral condensation as an obturation technique does not allow master cones to be condensed into prepared canal anatomy. Clinically, this means that the apical half of many laterally condensed canals are, in essence, single-cone root canal fillings. Alternatively, warm techniques intentionally move sealer and the core obturation material (either gutta percha or RealSeal*) into the various cleared ramifications of the prepared root. The use of warm techniques more predictably achieves the goal of endodontic obturation: to three-dimensionally fill all of the ramifications of the canal space and prevent the movement of bacteria (provide apical seal) along the length of the canal. Any step-back from this ideal (three-dimensional obturation) compromises long-term clinical success, as it leaves greater potential for unfilled space within the root canal’s system. 4) Does it matter if I use an obturator or master cone for obturation? There is abundant evidence in the endodontic literature, using Thermafil (Dentsply Tulsa Dental, Tulsa, OK) as an example, to prove that carrier-based obturation provides a clinically acceptable obturation relative to other noncarrier-based delivery systems. Both materials have their clinical application. I use both RealSeal One Bonded Obturators* (warm carrier-based bonded obturation product) and RealSeal* master cones based on personal preference in any given clinical case. Both of these materials create a bonded obturation that provides resistance to coronal leakage relative to gutta percha. RealSeal One Bonded Obturators* possess several features not shared by other warm carrier-based devices: they are dissolvable in chloroform, they can be shredded with the .08/25 Twisted File* at 900 RPM, and they create a bonded obturation with the aforementioned benefits. In essence, with chloroform and the Twisted File, RealSeal One Bonded Obturators can be easily removed from the canal. What matters far more in terms of obturation quality is how the master cone or warm carrier-based device is used. If the MC is respected, if the canal shape and master apical diameter are optimized, and if the quality of disinfection is high, it is possible to obturate canals to a high standard with either warm carrier-based devices or master cones. 5) How do I locate a calcified canal? The primary tool for the location of calcified canals is the surgical operating microscope (Global Surgical, St. Louis, MO), and as a secondary option, loupes (4.8x HiRes, Class IV Orascoptic, Middleton, WI) are immensely helpful. Access must be centered in the long access of the root, a task that is made much simpler with the aforementioned magnification and visualization. Noting the depth of dentin removal as well as the buccal to lingual and mesial to distal position during access is essential to remain centered in the long axis of the root. The color of the dentin should be observed at all times to discern the previous canal space from the lateral root wall dentin. Any time you are unsure of the position of the canals, radiographs from various angles should be taken to redirect the access. If you are at the cervical root level (crestal bone) with or without magnification and the canal has not been located, the case should be referred.6) How do I manage a calcified canal? Referral is always an excellent option unless you are certain that the given clinical case is within the scope of your skills, equipment, and time. If you keep the case, first it is essential to achieve and maintain patency. Personal choices vary as to whether carbon steel hand files or files designed for stiffness should be used to explore calcified canals. In any event, once the canal is located, the first hand K file that will navigate a severely calcified canal is usually the #6 hand K file. Ideally, this #6 is precurved and gently inserted repeatedly until it reaches the estimated working length. This often requires multiple insertions at various angles to allow apical insertion, especially when curvature is present in addition to calcification. Irrigation is copious during this process. The clinician should focus on getting the #6 to spin freely at the apex before trying to use a #8 hand K file. Using the #8 hand K file in a similar fashion, it is also inserted and used until it spins freely at the apex. The #10 follows the #8 hand K file. Using this sequence, when a #15 hand K file spins freely at the apex, the canal is ready for preparation with rotary nickel titanium files. The M4 Safety Reciprocating Handpiece Attachment* can make this process more efficient relative to performing these steps by hand. The M4 reciprocates a hand K file 30 degrees clockwise and then 30 degrees counterclockwise. This action replicates the manual action used to shape canals with hand K files. The M4 is inserted in an E-type coupling at 900 RPM at the 18:1 setting in a 1 mm to 3 mm vertical amplitude for approximately 15 to 30 seconds per hand file size. The hand K file is placed into the canal, under the rubber dam, to the true or estimated working length, and the M4 placed onto the hand K file. Once the given hand K file has been reciprocated for 15 to 30 seconds, the canal is irrigated and the next larger hand K file size is placed in the canal and the process repeated. M4 reciprocation is safe, efficient, and saves time as well as hand fatigue. 7) To what size should canals be instrumented? The endodontic literature is conclusive in that larger apical preparations create cleaner canals. In essence, a #50 master apical diameter will create a cleaner canal than a #30 master apical diameter. With larger apical diameters, the cleaner canal results from greater volumes of irrigation reaching the apex, improved irrigant hydraulic flow, and greater effectiveness of irrigant activation. It is especially important to instrument necrotic canals to enhanced apical diameters since necrotic canals are much more challenging to disinfect relative to vital inflamed canals. Methods to determine the ideal master apical diameter are empirical. One method is to gauge the apex. The hand K file that binds at the MC (TWL) represents the initial diameter of the MC. The clinician can instrument the tooth between three and six sizes larger than the first hand K file size that binds at the MC. It should be noted that the files used to prepare the larger apical diameter should be taken to the MC and not beyond. Taking RNT files beyond the MC risks apical transportation and other preventable iatrogenic events. 8) When should I refer a case? It is inherently unprofitable to access cases that are not completed. If you have the time, skills, will, equipment, and training to finish the case, then do so. Starting every case that presents itself in lieu of referral is highly problematic. The iatrogenic events that can ensue may not be retrievable and lead to destruction of tooth structure and/or loss of a tooth that could otherwise be avoided entirely by correct initial management. While a comprehensive discussion of case complexity is beyond the scope of this article, the more calcified, curved, long, short, atypical, and/or resorbed the roots are — among a host of other factors — the greater the indication for referral. There is only one best chance to bring any given endodontic case to a successful conclusion. I believe the best assessment of case difficulty and the necessity for referral is to ask oneself, “If the patient were my mother, would I start this root canal?” A number of clinically relevant questions have been answered here. Emphasis has been placed on early referral, achievement and maintenance of apical patency, and enhanced visualization and magnification. I welcome your feedback.Fig. 1 — Clinical case instrumented with Twisted Files* and obturated with RealSeal One Bonded Obturators.*
Fig. 2 — Clinical case obturated with RealSeal* Master Cones and the SystemB technique using the Elements Obturation Unit.*
Fig. 3 — RealSeal Sealer SE (self-etch)*
Fig. 4 — The Skini syringe and Navi tips (Ultradent, South Jordan, UT).
Fig. 5 — The M4 Safety Reciprocating Handpiece Attachment* * SybronEndo (Orange, CA)

Richard E. Mounce, DDS, is the author of the nonfiction book “Dead Stuck” — “one man's stories of adventure, parenting, and marriage told without heaping platitudes of political correctness.” Pacific Sky Publishing. DeadStuck.com. Dr. Mounce lectures globally and is widely published. He is in private practice in endodontics in Vancouver, Wash. Contact him at [email protected].