Endodontic insight: Two-instrument shaping for endodontic instrumentation techniques
This article first appeared in the newsletter, DE's Breakthrough Clinical with Stacey Simmons, DDS. Subscribe here.
Currently, there is a large number of endodontic instruments and instrumentation techniques on the market and being used today. Usually, when there are so many instruments and techniques to do the same job, it tells us that no single technique or instrument has found the answer to accomplishing the task in the easiest, most favorable way when compared to the others. We can choose from hand instrumentation, rotary or reciprocal handpiece-driven instrumentation, ultrasonic and sonic instrumentation, and any combination of these. Not only are the delivery systems different, but there also are many different types of instruments themselves; for instance, files, reamers, headstroms, etc., and each can be made of either stainless steel or nickel titanium.
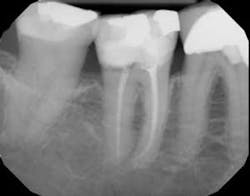
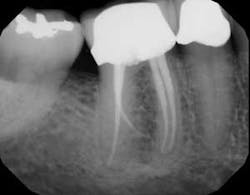
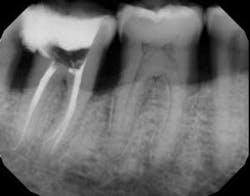
Each instrument and its accompanying technique have their own advantages and disadvantages. The key is to find a system to use in which all of the components are made to work together synergistically, such that they result in a procedure that is easy for the dentist to achieve the desired end results. In this instance, the desired end result is a debrided, clean canal that has been enlarged, shaped, and finished to receive a gutta-percha and sealed obturation (figures 1–4). This should be able to be achieved in an easy, quick, not too expensive, predictable, operator friendly manner. The dentist should not have to be Michelangelo to achieve the desired result consistently on every patient.
ALSO BY DR. ALLAN DEUTSCH |Endodontic insight: 4 restoration selections for success after root canal treatment
Let’s work backward for a moment. What size should any canal be enlarged to in order to achieve a successful result? The literature now says at least to a #30 or #35 endodontic instrument to the anatomic apex with a taper of .04 mm/mm. (1, 2) Knowing this, we now have our goal.
We can make access, open into the pulp chamber, and find the canals. Once the canals are found, I usually use a size #08 gray reamer to obtain my measurement. The measurement is achieved with the use of an apex locator. The apex locator is the only instrument we have that will give us the measurement to the constriction of the canal. Read the instructions for your apex locator, because each manufacturer marks a different point on its measurement scale indicating where the constriction or anatomic apex is located.
ALSO BY DR. ALLAN DEUTSCH |Endodontic insight: Where should the gutta-percha point end for optimal endodontic success?
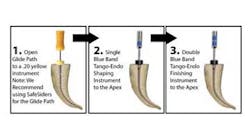
Once the measurement is determined, I begin to make the glide path in the canal. The aim of the glide path is to give us an easy, reproducible path for our shaping and finishing instruments to follow to the termination of the canal. The glide path is considered complete when we go from a size #08 to a size #20 (yellow) instrument to length in the canal. I prefer to use SafeSider (Essential Dental Systems) instruments in the reciprocation handpiece. SafeSiders have a flat side along one aspect of the instrument that does several things:
- It lessens the amount of metal on the instrument and increases the flexibility of the instrument.
- It synergistically increases the cutting efficiency of the reciprocating handpiece, which decreases the time it takes to clean and shape the canal and create the glide path.
- It increases the strength of the instruments and virtually eliminates instrument breakage due to cyclic fatigue and torsional stress.
The reciprocating handpiece is 30 degrees back and forth. We keep the canal lubricated with Irritrol irrigating solution (Essential Dental Systems). Irritrol is a two-in-one solution with both EDTA and chlorhexidine together. The EDTA removes the smear layer and helps the instruments slide in the canal. The chlorhexidine, in combination with several other ingredients, is used to kill the bacteria found in the canal and tubules within 30 seconds of application. The SafeSiders are placed in the reciprocating handpiece and then brought to the canal. Once the SafeSider instrument is in the beginning of the canal, the engine is started.
The reciprocating handpiece is a 4:1 reduction handpiece. The motor is set between 10,000 to 12,000 rpm, at a 1:1 ratio with maximum torque. The reamer will consequently reciprocate between 2,500 to 3,000 rpm due to the 4:1 reduction ratio. This is the normal and correct operating speed for the SafeSiders in the Endo-Express handpiece (Essential Dental Systems). The SafeSider instruments are able to run at this increased speed due to the reciprocating motion of the handpiece. Rotary instruments, on the other hand, need much slower revolutions to reduce instrument breakage. Because the SafeSiders are reciprocating at approximately 3,000 cycles per minute, they cut and shape the canal very quickly. We use a pecking motion with these instruments as shown in the video below. (figure 5)
Figure 5
In other words, the foot pedal is pushed down in a continuous motion and kept down; the handpiece with the instrument is moved up and down with apical pressure being applied. Each downward peck cuts and opens up the canal wall, and the instrument moves closer to the working length. If the instrument is short of the measurement, it should not be pushed; rather, more pecks should be used to get the instrument to length. Once the canal is enlarged to a size #20 yellow SafeSider, the glide path is considered complete.
At this point we now switch to the Tango system (Essential Dental Systems). The Tango system is composed of two instruments. A 30/.02 stainless steel shaper instrument and a 30/.04 NiTi finisher instrument. Both instruments are reamer designed and, consequently, are fairly aggressive instruments. They are highly efficient and cut dentin very easily and well. Both instruments are latch type and fit into the Tango reciprocating handpiece. This handpiece is also a 4:1 reduction handpiece and runs 2,500 rpm to 3,000 rpm. The 30/.02 stainless shaper (has one blue ring) and is used in a pecking motion as well. This instrument is used first. When first placed into a wet canal after the #20 SafeSider, the Tango shaper will probably be about 2 mm short of the working length. With a pecking motion (usually four to six pecks), it will reach the working length.
Next, the 30/.04 NiTi (two blue bands) instrument is used to create the final .04 taper in the canal (figure 6). This instrument will also be several millimeters short at first. I take between four and eight pecks to achieve the working length. Trying to push the instrument to measurement will just slow down the procedure and not accomplish the goal. The more you peck with it, the faster you will achieve the working length. Copious irrigation should be used, because these instruments cut very well and produce a lot of dentinal dust. Once the finisher is used, we now have prepared the canal to a 30 at the apex with a .04 taper. Included in the introductory kit is box of precision gutta-percha points.
This two-instrument endodontic enlarging and cleaning technique can probably be used in at least 80% of the cases that come into your office. It is a quick, efficient, predictable, operator friendly procedure. It should turn endodontics into a routine procedure in your practice.
This article first appeared in the newsletter, DE's Breakthrough Clinical with Stacey Simmons, DDS. Subscribe here.
References
1. ElAyouti A, Hülber-JM, Judenhofer MS, Connert T, Mannheim JG, Lost C, BJ Pichler BJ, von Ohle C. Apical constriction: location and dimensions in molars—a micro-computed tomography study. J Endod. 2014;40(8):1095–9. doi: 10.1016/j.joen.2013.12.002.
2. Aminoshariae A, Kulild JC. Master apical file size—smaller or larger: a systematic review of healing outcomes. Int Endod J. 2015;48(7)639–47. doi: 10.1111/iej.12370.


